home computer parts word excel internet


qohs home mcps home


DRAWING 2

  • Make sure the drawing toolbar is open.
  • Place your name, class and date at the top of the page.
  • If you are not sure what something is, place the cursor over the buttons on the drawing toolbar and locate the appropriate buttons. A yellow box will pop out when you pass the pointer over a button. We will learn to use the line tool ,call out tool, freeform tool, reshape tool, and text box.

Objectives:
Students will know and be able to:

1. Use multiple tools on the drawing toolbar to create various shapes.
2. Use the drawing toolbar to draw shapes already created.
3. Save as they are working, and create a back-up of the work that they have finished.

Click here for Samples of oval tool drawing objects on this page.


Using the Line Tool

1. Use the line tool to make a 1 point arrow that is black.

Note: After you drag out a line, you may double click the line or click the line Style box on the drawing toolbar to edit the line.

2. Use the line tool to create a blue line with 2 pt weight, 2 inches long, with arrows at both ends.

Using the Freeform, Reshape, and Text-box Tools

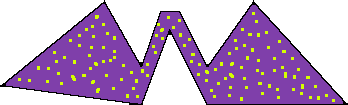
3. Click on the freeform tool (Autoshapes-->Line-->Freeform) and draw the following W. Remember to click and release, move the cursor to the new location, and click again.

  • Once you create the W copy and paste it. Control C(Copy) /Control V(Paste)

4. Select the duplicate copy you just pasted and click on the Reshape tool (Draw-->Edit Points) in the drawing toolbar. Change the shape of the original W to the following W by clicking and dragging on the selection points. Fill the shape with purple and add a yellow 10 % pattern.

  • In order to find the fill color, right click on the W
  • Scroll down to Format Autoshape
  • Click on the fill color and scroll down to fill effects
  • Click on the pattern tab and you will be able to edit the pattern

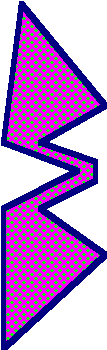
5. Duplicate the above shape, and fill with a green color, with a Trellis pattern, and make the line 4 pt weight and dark blue.

  • Locate the rotate button on the toolbar and rotate the object 90° to the right and it should look like the following:

6. Make a freeform object of your own using any drawing tool, with a 4 pt weight, dark green line! Place a text box with no line and no fill inside your shape and type your first name. Change the font color of your name to red.

Using the Call Out Tool

7. Click the call out button (Autoshapes>>Callouts). When the cursor turns into a + place the plus on the edge of your last freeform drawing and drag and let go.

  • Double click on the edge of the callout, click on the Size tab and make the width 3 inches and the height 2 inches.
  • Change the line to 1 pt weight, line color blue, fill with white.
  • Type your first name and then the word freeform in the callout box using 12 point size (For Example: Jason's Freeform). Center the text with the center align tool.

8. When you are finished save a copy of your work to your disk as>>Draw2(first initial)(last initial).

home | hardware | draw1 | draw2 | table1 | table2 | excel 1 | excel2 | internet | blackboard