|
The Drawing Tool Bar
Lesson |
|
Notice that the toolbar buttons will
be described by a yellow
box if you place the cursor over a button. |
| Use
the Tools on the Drawing Tool Bar to create the following: |

|
Using
the Oval Tool |
- Open
Microsoft Word and make the following shapes. If you can't find
it go to>>View>>Toolbars>>Drawing.
- Make
sure that you put your name, class, and date at the top of the
assignment.
- Double
Clicking in the object or border of the object will open the
fill
and line
edit
window for drawing objects only when you have the object selected.
Objectives:
All students will know and be able to:
1.
Understand the use of different toolbars in MS Word (specifically,
the Drawing Toolbar).
2. Change color, shape, and line weight within a shape.
3. Use text-boxes to insert text within a shape.
4. Save as they are working, and create a back-up of their work
when they are finished.
Complete
the following:
1)
Oval with a green
fill and no
line.
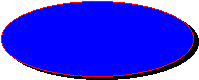
2) Oval with a blue
fill, red
line, 1 pt weight and a shadow.
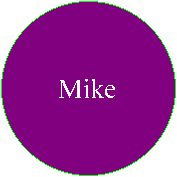
3) Circle (click the oval button, hold the shift key and drag...this
will allow you to draw a perfect circle) with a purple
fill, green
line and 1 pt weight.
4) Copy and paste (Ctrl + c will copy, and Ctrl + V will paste)
the #3 shape you just created--add a text box (Click on the text
box button and drag out a rectangular text box). Center your name
in the shape you just pasted.
- Place
the cursor on the edge of the text box . . .when it turns into
an arrow you double click.
- Select
Line None and fill none from the Edit Drawing Window. It should
look like the #4 shape below.
Samples:
The
Rectangle Tool
1. Make a square (click the rectange tool, hold the shift key and
drag...this will allow you to draw a perfect square), fill blue
and no line.
2. Make a rectangle, teal
fill, yellow
line with 4 pt weight.
3. Make a square, red
fill, rounded corners (AutoShapes>>Basic Shapes>>Rounded
Rectangle), blue
line with 1 pt weight.
4. Make a rectangle with blue
fill, green
line, 2 pt weight and a shadow.
5. Challenge (You need to do this):
Rectangle with a green
fill, purple
line with 2 pt weight, shadow and rounded corners. Place a text
box in the center of the shape and select no line and no fill for
the text box. Type Poland Regional High School in the text box.
Center align the text using the align button. Change the color of
the text to white. Thats it!
6. Congratulations! You just finished the first drawing toolbar
assignment. Save a copy of your work to your disk as>>Draw1(first
initial)(last initial).
home
| hardware | draw1
| draw2 | table1
| table2 | excel 1
| excel2 | internet
| blackboard
|